Monday, June 21, 2010

Chenille Stems

This week's art project unfolded quite on its own, which can be exciting and worrisome for a mom who likes to keep her house tidy! As was mentioned in an earlier post, I have made a lot of our art materials accessible to the girls, with the exception of paints and paint brushes. Yesterday I went for a short run and left the girls in dad's care, and when I returned I found chenille stems (formerly known as pipe cleaners) scattered across the floors in basically every room in the house. Rebecca and Elliot had found the unopened bag of 100 assorted chenille stems and quickly emptied the entire contents of the bag as they traipsed through the house, likely following the cat we are watching while grandparents are on vacation. After a quick moment of panic and a "What's going on here?" I realized that Rebecca was busy bending some of the chenille stems together into little creations. The following picture shows what she came up with.

The girls had also opened up a bag of beads and were stringing beads on the stems, or, in Elliot's case, stringing them on the stems and then slipping them off in rapid succession. For those with young toddlers like Elliot, chenille stems make an ideal material for stringing such beads as they are easy for little fingers to hold on to and the whole process is fabulous for strengthening dexterity. I have to admit that, while it sometimes makes me anxious to think about what can come from two young children exploring art materials at their own speed (this morning Elliot was putting colored pencils inside everyone's shoes), I am encouraged by the fact that they are starting to let their creativity take a life of its own! Yesterday for Father's Day Rebecca decided to decorate the house by stringing ribbons around all the door knobs, and she had so much fun doing it!

Candle Dipping

Last Friday our family took advantage of our new summer schedule and travelled up to the foothills for a day of hiking and enjoying Columbia State Historical Park. While at Columbia we enjoyed ice cream (much deserved after our morning hike), panning for gold, and candle dipping, and it is the latter that I am using for last week's art project. For $2 Rebecca chose a plain white candle and, with help from dad, dipped the candle in several different colors of hot wax, giving the candle a layered look. She chose red as her base color (no surprise here), and proceeded to add layers of orange, green and blue. Elliot made it clear that she wanted to take her turn as well, but I couldn't justify taking the chance of her sticking her little fingers into the pools of hot wax. Maybe in another year darling.

Monday, June 14, 2010

More Paint

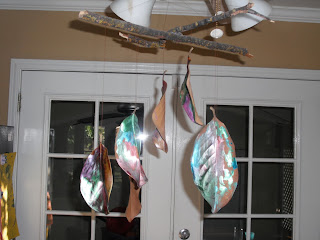
In case you haven't noticed as yet, my favorite medium by far is paint. I think Rebecca's is also. The other day we were at a concert in the park when we found a bunch of magnolia leaves laying on the ground. I love how large and waxy magnolia leaves are, and as soon as I pointed the leaves out to the girls they immediately set to filling their little arms full of leaves. On the drive home we were brainstorming what we could use the leaves for, and Rebecca decided she wanted to paint them. So I pulled out the paint and brushes, put the girls in play clothes (or no clothes as in Elliot's case), and we painted the leaves. Rebecca diligently covered the entire back side of every leaf, while Elliot, noticing her bare skin, decided instead to paint her body.
I guess that should teach me not to let her paint unclothed! The funniest part was that she named each body part as she was painting it, saying "toes," "knees," etc.

After the paint dried I took thread and strung the leaves up as a sort of mobile, using two sticks that Rebecca collected on another trip to the park as the cross bars. The girls really liked the result. As the leaves twist on the threads you can watch the painted sides disappear behind the unpainted sides and vice versa. We might make a trip to the craft store and pick up some pastel-colored beads to string on the threads to dress them up a bit. Perhaps we should even look to add some different shaped leaves as well.

Saturday, June 5, 2010

I Like to Eat Apples and Bananas!

This next project was entirely for educational purposes. I have been thinking a lot about the nutrition of my children recently, so I thought I would spend some time teaching Rebecca about the food pyramid and the different food groups. If she had her way she would eat peanut butter crackers and pasta for every meal, and while she likes plenty of other foods as well, these are what she requests when given an open-ended meal choice.

To start us off I went to www.mypyramid.gov and printed off a personalized food pyramid for Rebecca which laid out how many ounces/cups of each food group a preschooler her age is to eat in one day. Next we flipped through magazines and cut out pictures of food to match and glue on each respective food group. Now Rebecca loves to use glue sticks. Unfortunately she loves them so much that they don't last very long before all of the glue has been used up and we find ourselves opening the packaging of a new stick.
Finally we made up a chart to keep track of her daily food habits, which she fills in after each meal. I thought that by showing her what the requirements are and how well (or not) she fulfills those requirements it would give her (and me) a better idea of what kind of food choices to make throughout the day. The next couple of photos are what we came up with. The chart is a sample chart from yesterday that includes everything except for afternoon snack and dinner, which I am proud to say ended up completely filled in by the time those two meals had been consumed.

After three days of filling out charts I think Rebecca is a little weary of it, so I won't press it further, but her pyramid is posted on the side of the refrigerator as a constant reminder of balanced eating. Where was Elliot during all of this? I set her up at the little table with stamps and stickers, which she seemed completely content with. She is still too young for scissors, and with her fondness for chapstick I'd hate to see what she does with glue!

Sunday, May 30, 2010

The Montessori Way

A friend of mine recently introduced me to the Montessori methods of teaching, and between talking to her, visiting one of their schools, and flipping through a book about their philosophy, I became inspired to make my art materials more accessible to my kids. We have a large desk in the nursery that previously had been holding baby books, photo albums, etc, but I converted it into an art desk for Rebecca, complete with crayons, markers, colored pencils, many different scissors, tape, construction paper, stickers and stamps. The above picture looks a bit cluttered, which I will have to work on since a nice clear table space is sure to inspire the creative process more than a cluttered one, but you get the idea. When I surprised Rebecca with the assembled art desk, she got so excited she set to work almost immediately. The following pictures show what she came up with. At top is a pop-up book, the middle is a purse, and at bottom is a dolphin.
For Elliot I made room for a little table and chairs that we purchased from Ikea a couple of years back, which I set beside our drawing easel. As Elliot is demonstrating in the below picture, the easel can also be used for hiding things! Of course I should have known that once Elliot saw Rebecca at the big desk, she too would want to sit on the big chair, so she too gets her chance to make use of the new desk.

Coloring

This last week's project was to experiment coloring on different kinds of paper. First we took out the crayons and the markers. Then I gave the girls each a coffee filter, a paper napkin, a piece of newspaper, and a paper plate, and I let them have at it. Rebecca immediately noticed how difficult it is to color on a paper napkin as she had to hold it against the table with her arm to keep it steady enough to color on. Elliot seemed to enjoy using markers on the paper napkin, which resulted in textured colorings. Come to think of it she liked using markers on every surface instead of crayons as I think there is something about having to pop the lid on and off of the marker during the coloring process that makes markers much more interesting than crayons. The experiment with different paper surfaces gave Rebecca the idea to try coloring on the non-sticky side of scotch tape as well, which she found made her strokes much more fluid-looking, though less brilliant.


There is definitely a huge difference between a three-year-old's colorings and a one-year-old's colorings. Rebecca uses very controlled, deliberate lines (unless she is in a hurry), and Elliot's marks are always the same half-rainbow curve that she makes back and forth, back and forth, and which she repeats several times before switching to another color. While we have plenty of coloring books for the girls to decorate, I try to offer them plain paper more often than coloring pages as I understand it is better for children to experiment on their own when they are learning to draw. I've even heard that it isn't a good idea to demonstrate how to draw as it will give children the false assumption that there is one correct way to draw and will make their own scribblings seem inferior. I will often put a few scribbles on the page to get them started and then encourage them to fill the page with color in their own way. When it comes to drawing actual objects, the goal should be to encourage children to draw things the way they see them, not to show them what they should be seeing.

Wednesday, May 26, 2010

Veggie Stamps

For last week's project we used assorted fruits and vegetables as stamps. I gave each girl a large piece of construction paper and a couple of jumbo-sized stamp pads (washable and non-toxic of course), and I set a bunch of different fruits and vegetables out for them to stamp with. The produce was pre-cut, most often using cross sections, so the girls would have a flat surface to press into the stamp pads.

Rebecca decided she only wanted to use the red stamp pad (red is her favorite color as she will inform you several times a day), but Elliot experimented with several different colors. We used corn on the cob, mushrooms, onions, eggplant, lemons, cauliflower, green bell peppers, and an apple. The onions, cauliflower and lemons made the most interesting prints, though the eggplant was the easiest for Elliot to keep ahold of and stamp with again and again. The only problem with giving food to a one-year-old for use in an art project is that she is likely to try and eat it. Corn on the cob is a recent favorite of Elliot's, and she found it impossible to pass up, even uncooked!