Tuesday, November 30, 2010

Advent Tree

The season of Advent is upon us, and Rebecca and Elliot are extremely excited for Christmas! They are singing Christmas carols and enjoying Christmas lights and decorations on the houses in town. Normally our family spends the weekend after Thanksgiving buying and decorating our Christmas tree, which we will then enjoy for over a month. This year, however, we will be buying a living Christmas tree so we can plant it in our back yard after Christmas. Living Christmas trees, unlike cut trees, are only supposed to be inside one's home for four to five days, but because we still want to have a tree brighten our living room and keep us in the holiday spirit, we have decided to do an Advent tree until Christmas Eve, when we will bring in and decorate our living tree.
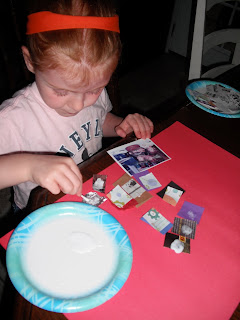
Our Advent tree is a small, artificial tree that we inherited from Jared's grandmother. It is just the right size for our two girls, and it is the perfect precursor to what will replace it in a few weeks' time. Several times each week we read a portion of the story of Christ's birth from the Bible, and then we have the girls decorate an ornament for one of the important characters in that part of the story. The ornaments are simple, just coloring pages of Biblical characters (Gabriel, Mary, Joseph, Herod, etc). After the girls color their ornaments using crayons or markers or colored pencils, even glitter, they are mounted onto a piece of construction paper and placed on the tree. Our goal is to keep the Christmas story at the front of all of our minds as we prepare to celebrate the birth of Jesus on Christmas morning. We are using our Advent wreath, and the girls both received Advent calendars from their Godmothers, all of which are other ways to keep Advent holy and count down the days until Christmas, but I wanted to do something that my four and nearly two-year-old can actually interact with and make their own, so this is what we came up with.
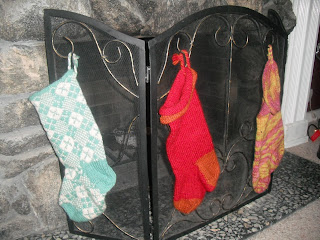
Speaking of Christmas, I just finished our fourth knit stocking (above are three of the four), and it's about time too! I started it one year ago, and since I was unable to finish it before Christmas, I put it down and didn't pick it up again until last week. There's something about the holidays that makes me want to be knitting something, so I've decided to knit a tree skirt as my next project. We don't have one still after years of celebrating Christmas together, and it's about time we did. I likely won't finish it before Christmas 2010, but Christmas 2011 should be easy to pull off.

Sunday, November 21, 2010

Fall Fun

So I guess we have dropped off the face of the blogging world, at least for the last two months! This is in part due to the fact that we have been BUSY! Between hosting out-of-town family, Halloween, Rebecca's fourth birthday, and now Thanksgiving, we have been up to our ears in planning, cleaning, cooking, and everything else. What's more, I have decided not to try and stick to my one art project per week regimen and instead work toward less frequent but more extensive projects. The truth is that between preschool, story time at the library, and our Church's child care, my kids do lots of art without me, and instead of throw together a quick project before the week's deadline is up, I want to plan projects that are more involved and more meaningful. With the holidays upon us there will be no shortage of ideas and opportunities for art experiences to introduce to my kids, and I am excited to see what we come up with.

For now I will share a few pictures of crafts we made at Rebecca's fourth birthday.
It was a chilly afternoon party, so we went with a fall theme. This picture is a leaf book that the kids at the party put together. I ordered plastic leaf rubbing forms from Oriental Trading, and each kid was able to create a collection of leaf prints to take home.

Also from Oriental Trading,
this second picture is a cardstock leaf with a paint-covered design the kids could reveal by scratching the paint away with little wooden sticks. Some simply scratched designs in the paint, while others decided to scratch all the paint off.

Finally, the third picture shows two contact paper trees I cut out and stuck to the wall of our covered porch. Rebecca and Elliot and I went outside and gathered as many different leaves as we could and put them in baskets for the kids to press onto the sticky contact paper. We found that the green leaves stuck better those that had already dried out.

Wednesday, September 15, 2010

Digital Photography

So it's been a while since my last post. A vacation to Alaska happened. And then the start of preschool happened. Now we find ourselves finally settling in to our fall routines, and I suppose it's about time to resume our weekly art projects. Even though this blog is short on posts, Rebecca and Elliot have not ceased dabbling in art projects. Rebecca's preschool class is making a paper vegetable garden in their classroom, and so far they have crafted carrots and broccoli to plant in said garden, not to mention their painted blue sky, brown dirt, and glittered raindrops. Elliot continues to scribble with crayons and colored pencils without end, and already she is using strokes that her older sister didn't try using until she was over the age of two (this is what happens when a child has an older sibling to imitate).

Before our trip to Alaska one of the girls' California grandmothers gave Rebecca a digital camera to use to take pictures. It was an older camera that she had since replaced, and it was red! Rebecca was in love and set to taking pictures immediately. We actually started Rebecca her own free flickr site on which she can post her favorites. Take a look!


Elliot has even taken her turn at snapping a few shots with the camera, though we haven't started a flickr page for her, yet. Let's just say that I just recently uploaded 71 pictures to our iphoto application, all of which Elliot had taken, and most of which were nothing more than close-ups of her fingers. Here are some samples for you to enjoy. And yes, the picture at the top of this post is a self-portrait that Elliot took of herself.

Monday, July 26, 2010

The Hole Punch

This week's project was another one that developed on its own. After a fun weekend getaway I was planning to spend the morning doing laundry and cleaning house while the girls played nicely with the toys they so missed while we were gone, but instead Rebecca decided to get into the art materials, and Elliot followed soon after. Still afraid to give up complete supervision of the art stuff, I decided to hang around and help as needed. Rebecca stumbled upon a kid-size hole punch
that came in a flower press kit she received from her aunt and uncle in Atlanta and was immediately intrigued. I showed her how to punch holes in paper and then string ribbon through the holes. At first she had a little trouble lining the hole punch up so that it made a complete circle for stringing ribbon, but after a little practice she figured out the technique. The ribbon stringing concept was also a bit tricky for her as far as weaving the ribbon in and out of the holes. With my help she was able to approach the first hole from the top and the next hole from the bottom, but when left on her own she preferred wrapping the ribbon around the edge of the paper and putting it through the top each time.

Elliot also had fun pressing the hole punch handle down with her palm, and after helping her punch several holes in a sturdy cereal box I tried to teach her how to string a shoelace through the holes she had made because, let's face it, she really does want to do everything that her older sister does. Instead of weaving the shoe lace she liked to pull it completely through each hole.

The hole punches were also a big hit. Rebecca used some of them to glue onto the papers she had strung along with pressed flowers from earlier in the spring, and Elliot enjoyed pressing the punches through the holes they came from in the first place, as well as scattering them around on the carpet. I guess laundry and house cleaning will have to wait until after naps today, with an unplanned but necessary vacuum job in order after this morning's art fun.

Thursday, July 22, 2010

Sidewalk Chalk

The weather has been pretty hot lately, so I make it a rule to get the girls outside every morning while it's still bearable. This week's art project involved playing with sidewalk chalk. This activity isn't new to the girls, but to make it a little more interesting we brought out a small tub of water and a handful of paintbrushes as well. First I had the girls draw with chalk as they always do. Elliot scribbled and Rebecca tried to draw recognizable objects in an unrecognizable fashion. Next I set the tub of water out and encouraged the girls to dip their chalk in the water prior to coloring with it. The result was very exciting as the colors appeared brighter and smoother. Finally we dipped paintbrushes in water and used them to blend the chalk lines we had previously put down on the concrete. The brushstrokes transformed the chalk strokes so that they looked almost like tempera paint rather than dry chalk. Even I had fun playing with this technique!

Wednesday, July 7, 2010

Beach Fun

As was mentioned in the previous post, summer time has changed our routines a good deal, which has also allowed us to get out of town on the weekends. A few weekends back we went to Santa Cruz, where we played on the boardwalk and enjoyed the beach. It was interesting to observe two valley girls' reactions to scenery both in and around Santa Cruz. Elliot, who is usually more adventuresome than her older sister, was frightened by the waves crashing on the shore, and thus refused to do anything but be held by mom. Rebecca on the other hand happily strolled up and down the beach searching for treasures to collect and built sand castles with dad. The previous day, however, she too had been frightened by the giant redwood trees in a grove in Henry Cowell Redwoods State Park. I suppose it makes sense that a child with a large imagination who isn't accustomed to seeing such large trees would be so affected by their ominous presence, as well as by the darkness they cast on the trail below. My husband and I have a fondness for natural places such as these, so I guess with more exposure and a bit of education our girls will come to love them too.

But back to art. We toted home a small bucket full of mussel shells, driftwood, and other small fragments of things that Rebecca found on the beach, and just yesterday we finally got around to doing something with them. I pulled out the glue gun and put spots of hot glue on a piece of driftwood while Rebecca firmly pressed the shells and feathers into the glue as it dried. Elliot also got to try, though she needed a bit more help than Rebecca did of course. Rebecca was fascinated by the thought of putting glue in a gun, and she especially enjoyed playing with the little strings of glue that form as the hot glue is stretched. When all was said and done each girl had a souvenir from the beaches of Santa Cruz, and I had a small blister on my thumb from the hot nozzle of the glue gun.

Thursday, July 1, 2010

Paper Collages

Our summer routine has left us little time for our regular activities, such as story time at the local library and morning outdoor park play. We spend most mornings these days watering our ever-growing garden and preparing for, attending, and unwinding from swim lessons. Today, when Rebecca woke up too ill to attend her lesson, we decided to take advantage of a "rest" day to get creative.
Rebecca has been quite intrigued by glue lately, so I decided to incorporate glue into this week's art project. I cut small scraps of various different kinds of paper, including newspaper, tissue paper, construction paper, etc, I placed each different kind on its own cocktail plate for sorting, and I gave each kid a large page to work on and a pool of glue with a cotton swab for spreading said glue. The girls then covered their pages with a collage of rectangular paper pieces. My directions were to dab glue onto the page and then place a paper piece onto the glue spot, but Rebecca soon discovered that she preferred to coat the back of each paper piece with glue before pasting it to the page. Elliot was a bit thrown off by this two-step technique and soon began scattering paper pieces on the page without the use of glue. As you might guess, when I picked up the pages to set them to dry, many of Elliot's paper pieces slid right off. Both girls were also taken by the little paper pieces themselves, and after lunch as I set to unload the dishwasher, I found a small stack of paper pieces inside the mixing bowl cabinet. Rebecca even tried to take a few into bed with her for naps! My new rule is that all art materials are to stay in the art room (aka nursery).
Elliot's creation is on the left, Rebecca's is on the right.

Monday, June 21, 2010

Chenille Stems

This week's art project unfolded quite on its own, which can be exciting and worrisome for a mom who likes to keep her house tidy! As was mentioned in an earlier post, I have made a lot of our art materials accessible to the girls, with the exception of paints and paint brushes. Yesterday I went for a short run and left the girls in dad's care, and when I returned I found chenille stems (formerly known as pipe cleaners) scattered across the floors in basically every room in the house. Rebecca and Elliot had found the unopened bag of 100 assorted chenille stems and quickly emptied the entire contents of the bag as they traipsed through the house, likely following the cat we are watching while grandparents are on vacation. After a quick moment of panic and a "What's going on here?" I realized that Rebecca was busy bending some of the chenille stems together into little creations. The following picture shows what she came up with.

The girls had also opened up a bag of beads and were stringing beads on the stems, or, in Elliot's case, stringing them on the stems and then slipping them off in rapid succession. For those with young toddlers like Elliot, chenille stems make an ideal material for stringing such beads as they are easy for little fingers to hold on to and the whole process is fabulous for strengthening dexterity. I have to admit that, while it sometimes makes me anxious to think about what can come from two young children exploring art materials at their own speed (this morning Elliot was putting colored pencils inside everyone's shoes), I am encouraged by the fact that they are starting to let their creativity take a life of its own! Yesterday for Father's Day Rebecca decided to decorate the house by stringing ribbons around all the door knobs, and she had so much fun doing it!

Candle Dipping

Last Friday our family took advantage of our new summer schedule and travelled up to the foothills for a day of hiking and enjoying Columbia State Historical Park. While at Columbia we enjoyed ice cream (much deserved after our morning hike), panning for gold, and candle dipping, and it is the latter that I am using for last week's art project. For $2 Rebecca chose a plain white candle and, with help from dad, dipped the candle in several different colors of hot wax, giving the candle a layered look. She chose red as her base color (no surprise here), and proceeded to add layers of orange, green and blue. Elliot made it clear that she wanted to take her turn as well, but I couldn't justify taking the chance of her sticking her little fingers into the pools of hot wax. Maybe in another year darling.

Monday, June 14, 2010

More Paint

In case you haven't noticed as yet, my favorite medium by far is paint. I think Rebecca's is also. The other day we were at a concert in the park when we found a bunch of magnolia leaves laying on the ground. I love how large and waxy magnolia leaves are, and as soon as I pointed the leaves out to the girls they immediately set to filling their little arms full of leaves. On the drive home we were brainstorming what we could use the leaves for, and Rebecca decided she wanted to paint them. So I pulled out the paint and brushes, put the girls in play clothes (or no clothes as in Elliot's case), and we painted the leaves. Rebecca diligently covered the entire back side of every leaf, while Elliot, noticing her bare skin, decided instead to paint her body.
I guess that should teach me not to let her paint unclothed! The funniest part was that she named each body part as she was painting it, saying "toes," "knees," etc.

After the paint dried I took thread and strung the leaves up as a sort of mobile, using two sticks that Rebecca collected on another trip to the park as the cross bars. The girls really liked the result. As the leaves twist on the threads you can watch the painted sides disappear behind the unpainted sides and vice versa. We might make a trip to the craft store and pick up some pastel-colored beads to string on the threads to dress them up a bit. Perhaps we should even look to add some different shaped leaves as well.

Saturday, June 5, 2010

I Like to Eat Apples and Bananas!

This next project was entirely for educational purposes. I have been thinking a lot about the nutrition of my children recently, so I thought I would spend some time teaching Rebecca about the food pyramid and the different food groups. If she had her way she would eat peanut butter crackers and pasta for every meal, and while she likes plenty of other foods as well, these are what she requests when given an open-ended meal choice.

To start us off I went to www.mypyramid.gov and printed off a personalized food pyramid for Rebecca which laid out how many ounces/cups of each food group a preschooler her age is to eat in one day. Next we flipped through magazines and cut out pictures of food to match and glue on each respective food group. Now Rebecca loves to use glue sticks. Unfortunately she loves them so much that they don't last very long before all of the glue has been used up and we find ourselves opening the packaging of a new stick.
Finally we made up a chart to keep track of her daily food habits, which she fills in after each meal. I thought that by showing her what the requirements are and how well (or not) she fulfills those requirements it would give her (and me) a better idea of what kind of food choices to make throughout the day. The next couple of photos are what we came up with. The chart is a sample chart from yesterday that includes everything except for afternoon snack and dinner, which I am proud to say ended up completely filled in by the time those two meals had been consumed.

After three days of filling out charts I think Rebecca is a little weary of it, so I won't press it further, but her pyramid is posted on the side of the refrigerator as a constant reminder of balanced eating. Where was Elliot during all of this? I set her up at the little table with stamps and stickers, which she seemed completely content with. She is still too young for scissors, and with her fondness for chapstick I'd hate to see what she does with glue!

Sunday, May 30, 2010

The Montessori Way

A friend of mine recently introduced me to the Montessori methods of teaching, and between talking to her, visiting one of their schools, and flipping through a book about their philosophy, I became inspired to make my art materials more accessible to my kids. We have a large desk in the nursery that previously had been holding baby books, photo albums, etc, but I converted it into an art desk for Rebecca, complete with crayons, markers, colored pencils, many different scissors, tape, construction paper, stickers and stamps. The above picture looks a bit cluttered, which I will have to work on since a nice clear table space is sure to inspire the creative process more than a cluttered one, but you get the idea. When I surprised Rebecca with the assembled art desk, she got so excited she set to work almost immediately. The following pictures show what she came up with. At top is a pop-up book, the middle is a purse, and at bottom is a dolphin.
For Elliot I made room for a little table and chairs that we purchased from Ikea a couple of years back, which I set beside our drawing easel. As Elliot is demonstrating in the below picture, the easel can also be used for hiding things! Of course I should have known that once Elliot saw Rebecca at the big desk, she too would want to sit on the big chair, so she too gets her chance to make use of the new desk.

Coloring

This last week's project was to experiment coloring on different kinds of paper. First we took out the crayons and the markers. Then I gave the girls each a coffee filter, a paper napkin, a piece of newspaper, and a paper plate, and I let them have at it. Rebecca immediately noticed how difficult it is to color on a paper napkin as she had to hold it against the table with her arm to keep it steady enough to color on. Elliot seemed to enjoy using markers on the paper napkin, which resulted in textured colorings. Come to think of it she liked using markers on every surface instead of crayons as I think there is something about having to pop the lid on and off of the marker during the coloring process that makes markers much more interesting than crayons. The experiment with different paper surfaces gave Rebecca the idea to try coloring on the non-sticky side of scotch tape as well, which she found made her strokes much more fluid-looking, though less brilliant.


There is definitely a huge difference between a three-year-old's colorings and a one-year-old's colorings. Rebecca uses very controlled, deliberate lines (unless she is in a hurry), and Elliot's marks are always the same half-rainbow curve that she makes back and forth, back and forth, and which she repeats several times before switching to another color. While we have plenty of coloring books for the girls to decorate, I try to offer them plain paper more often than coloring pages as I understand it is better for children to experiment on their own when they are learning to draw. I've even heard that it isn't a good idea to demonstrate how to draw as it will give children the false assumption that there is one correct way to draw and will make their own scribblings seem inferior. I will often put a few scribbles on the page to get them started and then encourage them to fill the page with color in their own way. When it comes to drawing actual objects, the goal should be to encourage children to draw things the way they see them, not to show them what they should be seeing.

Wednesday, May 26, 2010

Veggie Stamps

For last week's project we used assorted fruits and vegetables as stamps. I gave each girl a large piece of construction paper and a couple of jumbo-sized stamp pads (washable and non-toxic of course), and I set a bunch of different fruits and vegetables out for them to stamp with. The produce was pre-cut, most often using cross sections, so the girls would have a flat surface to press into the stamp pads.

Rebecca decided she only wanted to use the red stamp pad (red is her favorite color as she will inform you several times a day), but Elliot experimented with several different colors. We used corn on the cob, mushrooms, onions, eggplant, lemons, cauliflower, green bell peppers, and an apple. The onions, cauliflower and lemons made the most interesting prints, though the eggplant was the easiest for Elliot to keep ahold of and stamp with again and again. The only problem with giving food to a one-year-old for use in an art project is that she is likely to try and eat it. Corn on the cob is a recent favorite of Elliot's, and she found it impossible to pass up, even uncooked!

Thursday, May 13, 2010

Blueprints

For our next project we (or rather I) decided to make use of all this sun we've been enjoying lately and see what happens when the sun bleaches colored construction paper. The girls and I gathered various objects from around the house, including toys, forks, a cheese grater, etc, and we taped the objects onto sheets of blue and black construction paper. Then we placed them out in a location that was sure to receive lots of sun for several hours at a time. Then we waited. Normally the waiting would be difficult for a three-year-old and a one-year-old, but we had story time, lunch and naps to keep us plenty busy while we let the sun do its work. When the girls woke up from their naps we retrieved our papers, gently peeled the objects and the tape from them, and marveled over the result. The black construction paper remained unchanged while the blue paper had been altered to a much lighter shade of blue except for the areas of the page that had been covered by the objects we taped down. The objects left "blueprints" of themselves on the papers, some more distinct than others. We found that the objects that didn't stand too high off the ground and that easily laid flat, such as the small cheese grater, made better "blueprints" than the tall objects. Now that we know which objects work best we can try this again with greater success. We also found that it is helpful to secure the pages to the ground as even the slightest breeze will flip the paper and rend the experiment useless.


Monday, May 10, 2010

Paper Maché

This project is something I haven't done in a very long time.
It was inspired by a costume request for a three-year-old's birthday party we attended last weekend. The invitation instructed the invitees to come dressed as a favorite superhero. Because Rebecca has very little knowledge of superheroes, we decided to dress her as someone she could relate to: Skippyjon Jones. If you're unfamiliar with Skippyjon, he is a character from a line of children's books that are wonderfully illustrated and quite hilarious. Skippyjon is a siamese cat who thinks he is a chihuahua and who often finds himself daydreaming himself into all sorts of adventures. During these adventures he wears a mask and cape and plays the role of the superhero. Perfect! A mask and cape are easy enough to pull together, but what about a giant pair of ears? That's where the paper maché comes in.

I mixed up a batch of paper maché from flour, water, and a pinch of salt, laid out a sheet to protect my recently cleaned tile floors, cut a bunch of strips of newspaper, and gathered a few recyclables (plus a couple of balloons) for the girls to paper maché. For the two kitty ears I cut the corners of a toothpaste box and plastered them with the machéd newspaper strips. Elliot mostly just played in the goo, while Rebecca set to covering her balloon with machéd strips. She didn't quite grasp the concept of wringing the newpaper strips out before applying them to her balloon, so she ended up with a thick coat of the paper maché that oozed and dripped all over the sheet. Both girls were barefoot (they probably should've been naked, or at least in bathing suits) and whenever they would step in globs of the flour-water mixture they would cry out. I suppose I should be thankful that they disliked the feeling of the paper-maché on their feet because the cleanup really wasn't too bad! Thankfully my husband was home and was able to get the bathwater started just before Rebecca broke down about all the drips she was covered in (she dislikes dripping water on herself, let alone a white, runny mess)!

After the paper maché dried we painted the ears to look like Skippyjon's ears and glued them to a headband. The top picture is the result. Rebecca was pretty proud of her costume and begged to keep her face paint on for the rest of the day.

Thursday, May 6, 2010

Watercolors

Realizing that Elliot hasn't had the chance to use watercolors yet, we pulled out the paint brushes and the butcher paper and completed our next art adventure. We have a large assortment of brushes, from the standard watercolor brushes to foam brushes of different shapes, even old toothbrushes! Rebecca enjoyed experimenting with the different brushes, and she got really excited when I told her she could write letters using a paint brush. Who knew such a concept could be so awe-inspiring? As usual, Elliot mostly enjoyed experimenting with the water and the other supplies. Neither girl wore a painting smock; what was I thinking? Now I just need to find a couple of frames to showcase their paintings!

Wednesday, May 5, 2010

Happy Earth Day

This next project was inspired by Earth Day. It was also inspired by our need for place mats on our dining room table! Out in front of our house we have a circle of wildflowers surrounding a large deciduous tree. The girls and I went out and picked flowers, leaves, grasses, as well as a few roses from Grandpa's bountiful back yard, and we set to work pulling the petals off of the flowers for our project. I laid out place mat sized pieces of clear contact paper in front of each kid (sticky side up), and they set about pressing all the organic materials onto the contact paper in their own unique designs. Elliot seemed to prefer to place all of her petals and leaves in one of the four corners of the contact paper, so I helped her spread them out, keeping in mind how these might look on our table. After the contact paper was thoroughly covered, I placed another piece on top of the collage (sticky side down) and pressed the two sheets together. I trimmed around the edges with a pair of fancy scissors, and now we have two new place mats to keep our table clean! As we did this project a couple of weeks ago, the petals have been turning various shades of brown, which has provided us a teaching tool to use with our kids. While we probably won't use them forever, they at least keep something decorative on the table while the flowers we are pressing are ready for use!

Thursday, April 15, 2010

More Paper Flowers

I'm a bit late on this post, but better late than never! Last week's art project was from a kit that Rebecca received in her Easter basket. It comes from the people who produce those fabulous Klutz kits. I grew up with them, and I am excited to share them with my own kids. Generally they are composed of an instructional booklet with lots of fun ideas as well as a handful of materials to get a person started. They make books about making paper airplanes, making princess tiaras, crocheting, etc. The kit that Rebecca received was for making paper flowers.

The idea is to load a pipe cleaner up with lots of beautiful paper petals, add a leaf or two, a bug sticker, and there you have it. No glue, no scissors, just an easy concept that young children can tackle with minimal assistance. (Elliot didn't really participate in this activity, though she did enjoy bending the pipe cleaners every which way.) We blew through the materials that came with the kit, so we ended up making a trip to Michael's to get some fancy paper, new pipe cleaners, and additional bug stickers. The flowers made nice Easter presents for grandparents, and they are lovely to look at.

Thursday, April 8, 2010

Happy Easter!

Last week we colored Easter eggs for our art project. We used the traditional method of decorating the eggs with crayons and then dunking them in various colors of dye. We also experimented with wrapping the eggs in rubber bands prior to submerging them, as well as making a natural dye out of vinegar, chili powder and water. Everyone got pretty into it, even Dad. We were wishing we had hard-boiled more eggs to color.


I half expected Elliot to punch her fingers through the shell of an egg or two during the process, but she was very careful. Both girls' scribbles on the eggs were pretty light, making them difficult to see once the eggs were dyed. Rebecca wanted to try placing a single egg in multiple different dye colors, which resulted in some different tones. Overall it was a an enjoyable project, and somehow the Easter Bunny managed to find our colored eggs and hide them outside for the girls to find on Easter morning. What fun!
And speaking of Easter, I thought I would include a picture of our once-crown-of-thorns from a previous post. After the Easter Vigil Mass I painted and decorated the crown with whatever I could find on hand, symbolizing the crown of the Resurrected Christ. Last year Rebecca helped me decorate our crown with jewels and gold-colored paint, but this year I thought I would add its transformation to the Easter morning surprises. He is risen indeed!

Thursday, March 25, 2010

Spring Has Sprung!

It has actually been Spring where we live for quite some time, but with the recent celebration of the Spring Equinox we decided to make some lovely little blooms for this week's art activity. This was definitely another "use whatever's on hand" project. We took pipe cleaners, cupcake papers, napkins and pages of an old magazine to create a bunch of fake flowers. Elliot was only interested in bending pipe cleaners. I don't think she really could've done much more than that given the supplies I put before her. Rebecca and I, however, had fun making each flower it's own special creation.

I got this idea from a Klutz craft book (that Rebecca will likely get in her Easter basket this year, shh!) and thought it would be a good activity. We'll definitely do this again with other types of paper and perhaps some colorful felt. There are lots of possibilities here! And as long as the cat doesn't decide they will make good playthings, we can enjoy their sweetness for many days to come.

The top picture is a cluster of wild irises that have been growing in our gardenia beds since we moved into this house two and a half years ago. I originally thought they were weeds but I was happily surprised when the bloomed the first time. We didn't plant them, but we'll keep them!